Saturday, October 22, 2016

Les Paul Junior Kit Build

Our guitar wiring expert friend, Arnold, has always been a fan of Les Paul Juniors. And while browsing the net recently, he came across a seller offering a double cutaway Junior-style neck and body for a little over 300 bucks.

Taking the plunge, the beautiful raw wood kit that arrived featured an Indian rosewood fingerboard, mahogany neck, and a one piece mahogany body. Our luthier buddy, Luca Quacquarella, was tasked with assembly, painting and final setup.
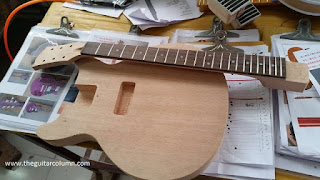
Les Paul Junior kit mahogany neck and body
Raw mahogany neck and body

Arnold chose to not have the mounting stud holes for the bridge drilled. The kit maker would only provide metric sized screw holes whereas Arnold wanted to use a compensated MojoAxe bridge that came with Imperial sized studs.


Some Les Paul Junior History

Originally issued in 1954, the Les Paul Junior was Gibson's foray into the budget and student market. Featuring slab mahogany bodies and very simple electronics in the form of a single P90 bridge pickup and basic volume and tone controls, the Junior eschewed all accoutrements of its more expensive Les Paul solidbody cousins.  

No carved maple tops, binding, or fancy inlays for this little guy!

Les Paul Junior kit mahogany neck and body
Checking the neck to body fit

While the very first Les Paul Juniors were single cutaway instruments finished in a brown sunburst, Gibson later made available a TV Yellow finish model in 1955. In the days of black and white television, white guitars tended to 'wash out', appearing overly bright on-screen. The TV Yellow finish made the guitar appear a more natural white.

The double cutaway Junior, like Arnold's kit, was released in 1958 in response to player's requests for more access to the upper frets.

Assembly and Paint

A little bit of play was evident in the neck to body joint when the kit arrived -- they could have cut it more precisely for a snug fit.

After gluing the neck to the body, Luca proceeded with applying a light dark stain to bring out the grain of the wood a little more under the final paint. Three coats of nitrocellulose lacquer, closely matching Gibson's original TV Yellow, were then applied, with the paint allowed to dry thoroughly between coats.
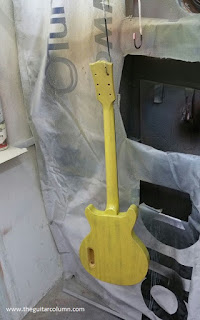
Les Paul Junior kit TV Yellow
Spraying the first coat of TV Yellow

On the black painted headstock face, Arnold chose to go with a smaller, stylized Luca Custom Guitars logo for simplicity. 
Les Paul Junior kit headstock face
Luca custom logo and Kluson tuners


Hardware and Electronics

In the spirit of the original Les Paul Juniors, Kluson button vintage-style tuners were chosen, along with a black, single-ply pickguard. Luca also installed a bone nut he cut and polished from scratch.

Next came the tricky task of drilling the screw holes for the bridge studs.

Because the Junior used a simple stopbar tailpiece that functioned as a bridge, the measurement had to be very precise as there are no individual saddle screws for intonation adjustment. The MojoAxe stopbar bridge is compensated for better intonation by way of subtle ridges molded into the top, but its placement is still crucial nonetheless.

Instead of measuring from nut to bridge, Arnold suggested attaching a high E and a low E string to an anchor point on the workbench. Sliding the bridge along the body and checking with a strobe tuner until intonation was achieved, the stud holes were then drilled and the bridge mounted. No room for error here!

Les Paul Junior kit Porter P90 pickup
Porter P90 hot wound pickup installed

At Luca's suggestion, a hot wound Porter P90 pickup was chosen, with Arnold supplying his own wiring harness for the electronics -- Emerson pots, in values of 500k for the volume control and 250k for the tone, with a .022uF paper-in-oil capacitor. Apparently, pot values of 500k for volume and 250k for tone are the magic numbers for P90 equipped guitars.
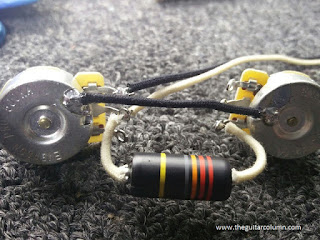
Les Paul Junior kit wiring harness
Emerson volume and tone pots and paper-in-oil capacitor
Relic'ing

To give it that lived-in, played for decades look, Luca gave the guitar a tasteful relic finish.

Les Paul Junior kit relic TV Yellow finish
Relic'd TV Yellow finish

So many guitar manufacturers these days use templates to map out wear spots and dings on new guitars. It saves a lot of time, but one can't help feeling a little cheated that almost no thought went into relic'ing the instrument. Not to mention that you would have guitars with about the same wear spots in the same places.

Les Paul Junior kit relic TV Yellow finish
Nitrocellulose TV Yellow finish

Luca still does it the old fashioned way -- artistically and with much deliberation for where a guitar might receive its dings, scrapes and wear spots after years of gigging.

And damn, does this thing look like a real Les Paul Junior from the 50's!

Thursday, May 12, 2016

Refinishing A PRS Custom 24 Part 2 | The Final Reveal

In our last article, Refinishing A PRS Custom 24 Part 1, we detailed the removal of the guitar's cloudy green lacquer and extensive prep work for the big refinish -- entirely in nitrocellulose lacquer -- by luthier Luca Quacquarella.

In my humble opinion, our Italian friend really outdid himself on this particular job.

The following pics were taken by Reggie Tan at Luca's workshop on the day he went to pick up his newly refinished PRS.

As always, click on the pictures to enlarge. Enjoy!

PRS Custom 24 refinished top
PRS Custom 24 refinished top. This guitar was finished entirely in nitrocellulose

PRS Custom 24 refinished top
Stunning flame maple top on this PRS Custom 24 Artist model

PRS Custom 24 Artist abalone bird inlays
Artist models like this one also feature choice abalone mother of pearl bird inlays

PRS Custom 24 scraped binding
Another view of the top and 'scraped' maple binding

PRS Custom 24 Artist headstock abalone inlay
Inlaid abalone PRS logo and Indian rosewood headstock veneer

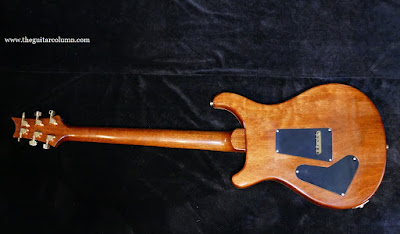
PRS Custom 24 refinished back
Back and neck also refinished in nitrocellulose lacquer

PRS Custom 24 refinished headstock back
A view of the back of the headstock. Note distinctive quarter sawn grain pattern

PRS Custom 24 refinished back and neck
PRS's distinctive neck joint

PRS Custom 24 refinished top
Final view of the top. Note light shading of violet mixed in with blue on the edges

PRS Custom 24 refinished
Happy owner, happy luthier! Luca (on the left) with Reggie
(Photographs of this PRS Custom 24 courtesy of Reggie Tan. All rights reserved)

Monday, May 9, 2016

Refinishing A PRS Custom 24 | Part 1

If you read my previous two posts about my good friend Reggie Tan's Music Man Luke guitar, what I didn't mention was that Reggie had also sent in his PRS Custom 24 for a refinish at the same time.

His PRS, built in 2004, had developed a strange cloudiness in the finish and the turquoise was slowly fading from the original blue to a faded green for some reason.

PRS Custom 24 Turquoise
PRS Custom 24 in 2008 before the finish started to cloud

PRS uses both acrylic urethane and polyester in their guitar finishes, laying down the poly basecoat before spraying it over with the acrylic. The acrylic urethane is supposed to give the guitar the look and feel of nitrocellulose, without having to deal with the labor intensive application of nitro in a factory setting.

I strongly suspect that PRS's layering of the two kinds of finishes -- combined with Singapore's crazy humidity -- caused the finish to go cloudy over time. And unlike Reggie's Music Man Luke where the finish was literally flaking and falling off the body like potato chips, I have seen quite a number of PRS guitars with cloudy finishes. 

PRS Custom 24 cloudy finish
PRS Custom 24 before refinishing. Note cloudy, green finish


When Reggie mentioned he wanted to get his Music Man Luke refinished, I recommended Luca Quacquarella. 

Reggie wasn't familiar with Luca's work but meeting our Italian friend and seeing the quality of some of his other refinishing projects convinced Reggie enough to entrust both his Music Man Luke and his PRS to him.

PRS Custom 24 cloudy finish
Finish clouding is apparent. Could it be humidity?

I remember that Luca's initial reaction to being asked to refinish the PRS was one trepidation. 

He explained that with the guitar's carved top and tough polyester finish, it would take considerable time to strip the guitar down to bare wood. He also mentioned that he couldn't be certain if he could strip off the original turquoise stain entirely -- too much wood would need to be shaved off. Wood stain goes deep into the pores of the wood and now the turquoise had turned a sickly shade of green! To be fair, he asked for a couple of days to consider taking on the project.

Reggie had a specific finish in mind -- a transparent light blue stain to show off the flame maple in the center and a darker shade of blue on the outer edges, sprayed in a sunburst fashion.

Needless to say, Luca had his work cut out for him, if he agreed to take on the project.

The Big Refinish

The first major task was stripping the poly finish off the body's top and back, the headstock, as well as the back of the neck.

There was some discussion about just refinishing the guitar's top only. But given that the finish was also starting to get cloudy on the back, neck and headstock, a complete refinish of the entire guitar was decided.

A major overhaul. 

PRS Custom 24 cloudy finish
Even the clear finish on the neck and back weren't spared


Luca spent the most time sanding the finish off the carved top by hand, being careful not to flatten out the original contours. Once the poly finish was completely sanded off, the original turquoise stain was finally visible. Which tells me that the cloudy clear polyester topcoat was yellowing as well, causing the finish to take on the green hue. Yellow and blue equals green.

PRS Custom 24 finish stripped
PRS body stripped revealing turquoise stain underneath

There was still a good amount of the original turquoise stain in the wood after he was done, but rather than try to take off more wood, he decided he would apply a blue stain over it. 

Again this was a close judgement call. Too many layers of stain and the top gets too dark.

PRS Custom 24 turquoise stain
Beautiful flame soaked up the original turquoise stain


Fortunately, the Custom 24 features an inlaid Paul Reed Smith logo in beautiful abalone on the headstock which meant one less thing to worry about. The headstock could just be stripped and clear coated, unlike the Music Man Luke where the logo had to be painstakingly recreated.

PRS Custom 24 headstock
Stripped PRS headstock with inlaid Paul Reed Smith logo

After a couple of coats of stain, the guitar was allowed to dry thoroughly before applying pale blue clear lacquer. Luca is old school and very much a traditionalist when it come to guitar finishes.

He prefers to work with nitrocellulose instead of polyurethane, even though nitro is far more tedious to apply, requiring multiple coats with ample drying time and a thorough wet sanding between coats.

PRS Custom 24 nitrocellulose lacquer
All nitrocellulose finish. Shades of things to come!
(Photo credits: Luca Quacquarella and Reggie Tan)

Stay tuned for Part 2 of Refinishing A PRS Custom 24 for a dose of serious guitar eye-candy! 

Thursday, May 5, 2016

Refinishing A Music Man Luke Part 2 | The Final Reveal

In Part One of refinishing this Music Man Luke guitar, we talked about the many stages and the weeks it took to get it to its final state.

Reggie the owner spent many hours with our patient Italian friend, luthier Luca Quacquarella, discussing, poring over and, at times, agonizing about the many small details to get everything just right. It was, without doubt, a labour of love that transformed this guitar from a very sorry state to its current glory.

But enough jibber-jabber.

I am very pleased to present to you, dear reader, the refinished and resurrected Music Man Luke. Click on the pictures to enlarge, and enjoy!

(Photographs courtesy of Reggie Tan. All Rights Reserved)

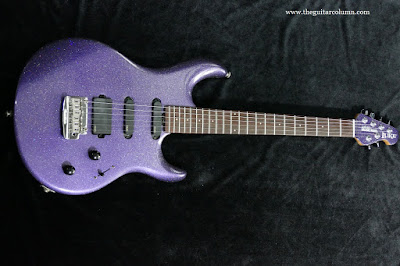
Music Man Luke refinished body
Seven coats of nitrocellulose lacquer was used to build the finish 
Music Man Luke refinished body
Sparkly!
 Recreated Ernie Ball Music Man and Luke logo  
Music Man Luke refinished headstock
Another view of the headstock
Music Man Luke refinished headstock back
Recreated 'Made In San Luis Obispo' logo
Music Man Luke refinished neck
The back of the neck refinished in clear nitrocellulose
Music Man Luke neck plate
View of the Music Man 5-bolt neck plate and refinished back
Music Man Luke refinished neck and body
Full view of the refinished neck and back
Music Man Luke bridge and pickups
Stainless Allen screws replaced the original rusted saddle screws 
Music Man Luke refinished body
Rainbow of pink, green, gold and silver mixed in the metallic purple flake

Music Man Luke refinished body and neck
The metallic purple body against the highly figured maple neck. Stunning!
Music Man Luke refinished
Full view of the refinished Music Man Luke 

Wednesday, May 4, 2016

Refinishing A Music Man Luke Part 1

In an earlier article, I mentioned my encounter with a Music Man Luke and its unusual flaking finish. The polyester finish -- usually the toughest, most impervious of guitar finishes -- was very mysteriously lifting and peeling away from the body in brittle chunks. A potato chip-sized piece even fell away as I was examining the guitar, landing on the floor with a distinct 'plik'.

Music Man Luke body
This Music Man Luke's original flaking finish.

Our good buddy Reggie, the owner of this guitar, had left it in the care of a repair shop where it languished unattended, for -- get a load of this -- not days, not weeks, but several months! The shop owner claimed that he was 'waiting for the Music Man decal'.
Sure. Waiting for it to materialize out of thin air, maybe. And it didn't occur to him to at least start working on the body? Amazing.

Music Man Luke headstock
Headstock area where more of the original finish seems to be peeling off 

When Reggie told me how long he had been waiting on that guitar, I instantly thought of my luthier friend Luca Quacquarella. Showing him a few pictures of the Les Paul BFG that Luca had refinished for me convinced Reggie that our Italian friend was indeed the man for the job.

Luca had to clear his backlog of repairs before he could start work on the Music Man. But within a week, Reggie sent me this picture.

Music Man Luke body stripped
The Luke stripped down

To Ernie Ball/Music Man's credit, they did choose a pretty clean piece of alder for this guitar. Nicer woods are normally reserved for where the wood grain would be visible, like in clear or sunburst finishes. More gnarly woods are used for opaque colors like the black sparkle finish this guitar came in. 

With the body stripped down to the bare wood, the refinishing process could finally start!

Luca recommended going with an all nitrocellulose finish for this guitar. Nitro finishes are much more labour intensive to apply but they allow the guitar to breathe and resonate better than the plastic, polyester finishes. Perhaps not a significant difference tone-wise on a solidbody guitar like this one, but a huge difference when it comes to acoustic and hollowbody instruments.

With a nitrocellulose finish, up to ten coats are needed for a mirror-like shine. Each coat must be allowed to thoroughly dry for a day or two, then wet sanded with very fine grit sandpaper before the next coat.

Many major guitar manufacturers that claim to use nitrocellulose usually mix in a plasticizer to allow for fewer coats to achieve a high gloss finish. Far less labour intensive and they are able to get the guitars out the door more quickly.

Luca started off by spraying a couple of initial coats of white to act as a base coat.

Music Man Luke base coat
Initial white base coat

Luca has managed to source a local supply of nitrocellulose paints in a stunning variety of colors. Because of current restrictions on importing paints and flammable liquids, a license would be required if he were to order them by mail through companies in the US like Stewmac.com

Metallic purple nitrocellulose paint

After a few tests of the purple lacquer mixed in with different degrees of black tint to decide on the final shade of metallic purple, the next step was choosing the right size of metal flake or paint glitter.

That's right folks, metal flake is available in many colors and in several sizes! Too small, and the effect is too subtle. Too large, and it's Mardi Gras time!

Metallic purple glitter paint flakes
Metallic purple glitter flakes


Decisions, decisions..

After a couple of test runs, Reggie and Luca agreed upon the metal flake size that they felt would work best. And although the jar says 'purple metallic flake', the end result shows a mix of purple, pink, gold and silver flecks. Real nice! But unfortunately something that doesn't show up readily in photos.

And through the entire process, Reggie was not a mere bystander.

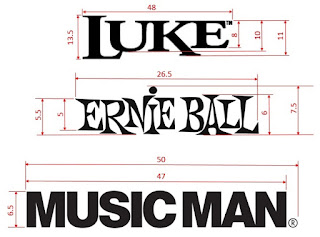
Luca has a go-to guy he always uses to make his custom guitar decals. And when the finish was stripped off the headstock, the original Music Man Luke logo on the front and 'Made In San Luis Obispo' lettering on the back, went along with it.

Music Man Luke headstock logos

Reggie's challenge was to put his design skills to use to recreate the headstock logo in graphic form. For Luca's decal guy to reproduce it properly, it also needed to be to the exact scale as it would finally appear on the guitar.

Not bad, Reg. Not bad at all. Even Steve Lukather wouldn't be able to tell that this was a reproduction decal.

Music Man Luke headstock decal
Music Man Luke decal applied to headstock

And since his guitar was undergoing a major refinish, Reggie decided to also source for a set of stainless steel Allen screws to replace the rusted height adjustment screws of the bridge saddles.

Music Man Luke bridge
In the process of installing new stainless steel saddle screws 

Why on Earth guitar manufacturers would use ordinary metal screws on a part of the guitar that would be constantly exposed to sweat and grime from the player's hand, I could never understand. And on a high-end guitar, no less. Once those suckers rust up, any attempt at adjusting saddle height becomes impossible. And stainless steel screws are cheap too.

Luca's initial plan was to follow the original Music Man style of lacquering the back of headstock up to the first fret, and using a mineral wax composite for the rest of the neck for that bare wood feel. In the end I was quite relieved when he decided to hard lacquer the back of the entire neck. Minimal chance of that thing moving, ever!

He must have heard my protestations and my mentioning playing another Music Man Luke recently where the neck was starting to twist, resulting in several buzzing frets along the treble side only, despite the high action.

It's always a crap shoot when going with an oil finished neck. Especially in Singapore's high humidity and warm weather. Factor in a highly figured maple neck, like what Music Man uses, and the odds of having a warping neck increase several-fold. 

Just my humble experience. Your own experience may vary depending on the climate and humidity of your country and the quality of your environment where you store your guitars.

After spraying the white undercoat, Luca next applied several coats of the metallic purple paint, allowing each coat to dry and wet sanding between coats as mentioned. The purpose of wet sanding between coats is to ensure that the finish has no bumps, drips or 'orange peel', a fine dimpled texture as a result of overspray. All imperfections and uneveness must be removed before the next coat is layered otherwise they will all show up in the final finish in all their lumpy glory. Which will look awful on close inspection.

Music Man Luke refinish
Checking in bright light for spray flaws

The final coat is then polished on a buffing machine to a high gloss lustre.

And in case you're wondering, Luca does all his refinishes in a proper spray booth with a suitably sized exhaust fan. And did I mention his white haz-mat suit, gloves and respirator? Nitrocellulose is highly carcinogenic and is not something you would want to inhale in its liquid form!

Stay tuned for Refinishing A Music Man Luke Part 2 and the final reveal!

Monday, May 2, 2016

Aria Pro II Cardinal Series CS-250 | Vintage Find

A few weeks ago my good buddy Eric forwarded a couple pics of this Aria Pro II CS 250 from the early 80's that he happened to see at a local rehearsal studio. My response was the usual "Cool guitar, man. Go for it!".

I forgot all about it until last week when Eric and I met up for lunch and our usual Thursday afternoon jaunt to our favorite local music store. Eric needed to buy a guitar stand and the ones we saw on sale were way overpriced for some reason. Long story short, we ended at up at the same rehearsal studio where Eric had seen the Aria a few weeks before.

Aria Pro II CS-250
The photo Eric sent from the rehearsal studio

I remember the Aria Pro II Cardinal Series as being the most ubiquitous of the budget guitars back in the day. A step below the 'lawsuit' Ibanezes and Grecos that were going for $300 to $350 Singapore dollars, new and used in the late 70's and early 80's, the Aria Pro II CS-250's were about $200 retail. 

The price as I recall, matched the model number -- common practice amongst some Japanese guitar manufacturers. In Japan, the CS-250 might have had a suggested retail price of ¥25,000.

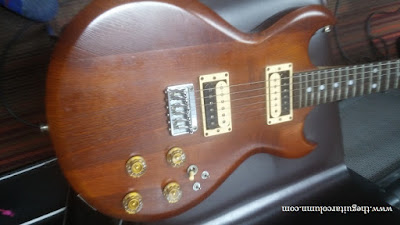
Aria Pro II CS-250 Walnut
Aria Cardinal Series CS-250 in Walnut finish


When Eric sent me the pictures he had taken of this guitar I wasn't overly impressed. But when I actually held it in my hands I realized that it was in amazing condition for a guitar that was made in the early '80s. Other than a small ding on the lower horn and rusty pickup mounting screws, this guitar was in excellent shape. There was hardly any wear on the frets and the headstock was devoid of any dings or chipped paint that are commonly seen on guitars of this age.

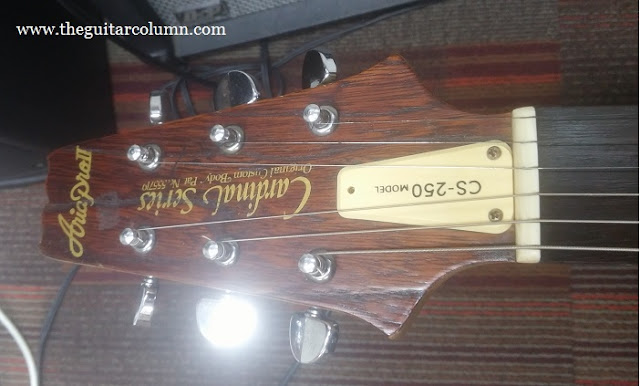
Aria Pro II CS-250
Beautifully grained Ash wood veneer over the headstock face


And did I mention that it was just dripping with vibe?

If you read one of my earlier articles, How To Choose A Guitar That's Right For You, I mentioned that if a guitar seems to scream 'take me', then that was the guitar for you. This was indeed one of those rare moments.

And all for $250, including original hardcase!

A Bit Of Aria History

Arai & Co., Inc. was an import company founded by classical guitarist Shiro Arai in the early 50's, In 1956 they began retailing acoustic and classical guitars and in 1964, Arai commissioned Matsumoku, a prominent musical instrument factory, to build acoustic guitars. By 1966 the first Arai, Aria and Diamond electric guitars were born. Arai had decided that Aria would be a more suitable, musical sounding name for the international market.

And target the international guitar market they did, with their budget, bolt-on neck copies of the Gibson Les Paul in 1969. More copies of other Gibson models, along with Fender and Ampeg guitars soon followed.

By the early 70's, American guitar manufacturers had begun to notice the outstanding sales of the Japanese copy guitars and basses, and Cease and Desist letters were sent to US importers of these instruments, hence the term 'lawsuit-era guitars'.

Aria's answer to the ban on the import of their copy guitars were the Aria Pro II models which they built at the Matsumoku factory starting in 1975. Instruments from this period are sometimes referred to as 'Matsumoku Era', since the Matsumoku factory stopped building guitars in 1987.

The CS or Cardinal Series began production in 1981 and comprised of the CS-200, CS-250, CS-300, CS-350, CS-400, CS-Deluxe and CS-Custom models. Only the CS-400 and CS-Custom featured set-in necks, with the other models being bolt-ons.

Aria Pro II CS-250 Features

The Cardinal Series was Aria's attempt at producing an original design after their 'lawsuit' Gibson and Fender copy guitars could no longer be distributed in the US. Since they were up against established American brands, Aria was determined to make their guitars both more affordable and more versatile. 

Aria Pro II CS-250 neck joint
Aria's Accurate Bolt-On System neck joint. Notice 3-piece maple neck

The Cardinal Series' take on Gibson's three-a-side headstock featured a straighter string pull over the nut for better tuning stability while the bolt-on versions featured what Aria proudly proclaimed to be their Accurate Bolt-On System. Aria's bolt-on maple necks sit snugly in a deep neck pocket that held the neck firmly, without any possibility of any side to side movement. With Fender's bolt-on design, a hard bump could instantly misalign the neck in the neck pocket necessitating the loosening of the bolt screws and realigning the neck.    

Why Aria never licensed out their Accurate Bolt-On System we'll never know. It surely makes a bolt-on have the tone and sustain of a set neck at least, without losing that snap and bite you can only get with a bolt-on.


Aria Pro II CS-250 Accurate Bolt-On neck joint
Deep pocket neck joint of the Accurate Bolt-On System

Electronically, the CS-250 really excels. The two Protomatic IV humbuckers are wired to coil-tap and phase reversal switches so that the player could get more sounds out of the two humbucking pickups. The coil-tap switch sets both pickups to single coil mode while the phase switch works only when the pickup selector switch is set to the center position, both pickups on. The effect of the phase reversal switch is very subtle but the coil-tap instantly drops the output of the humbuckers and provides a very clean, thinner sound. Not exactly Strat-like by any stretch of the imagination, but handy for funky rhythms and twangy lead lines. 

One problem is remembering what these switches do, especially if one hasn't played this guitar in a while! 

Aria Pro II CS-250 wiring configuration
Coil tap and phase reversal switches on the CS-250

For the bolt-on Cardinal Series, Aria chose to go with 3-piece maple necks, with the center piece set in a reverse grain from the outer two pieces. Other than being a cost cutting measure -- smaller pieces of wood could be glued together and cut -- it also made for a more stable neck than if it were made out of a single piece of maple. 

Aria Pro II CS-250 Features List:

  • Ash body with contoured edges
  • 3-piece maple neck, rosewood fingerboard, 22 frets
  • 630 mm scale length (Gibson scale)
  • Protomatic IV humbucking pickups with cream/black bobbins
  • Two volume and two tone controls
  • Mini toggle switches for coil cut and phase reversal (phase switch only works when both pickups are on)
  • Through-body strung die-cast bridge 
  • Walnut matte finish (Padouk Red was the other finish option)

Feel-wise, the Aria Pro II CS-250 is a lot like a double cutaway Gibson Les Paul Junior -- small and compact -- although the roar and sustain from the twin humbuckers make it anything but. Those Protomatic IV pickups have some serious output and are one of the loudest pickups I've encountered. The neck pickup was especially loud and tended to overshadow the bridge pickup.

Setting it further away from the strings and bringing the bridge pickup up as close as it would go without touching the strings helped to even them out.

Aria Pro II CS-250 Protomatic IV pickup
Zebra coils of the Protomatic IV pickups

The neck of this particular guitar is adjusted nearly straight, with minimal neck relief, just how I like it. However, my attempt at turning the truss rod either way to see if it was working proved futile. It was tight as can be and refused to budge out of the position its held for the last 30-something years. Rather than risk breaking anything, I decided to not force it. Leave well enough alone, I always say.

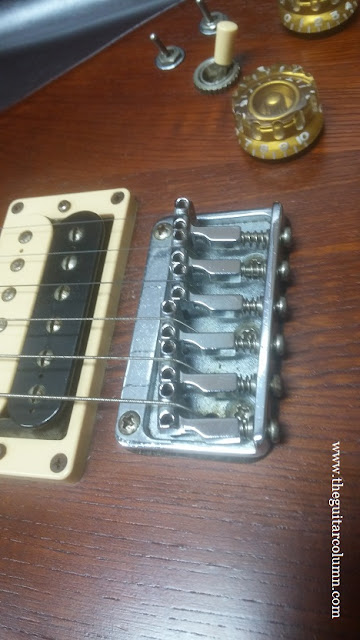
On close examination, I noticed the die-cast, string-through-body bridge had one of the most unusual -- and original -- saddle designs on any guitar I've seen. Rather than the usual, rectangular saddle blocks, the Cardinal Series' taper from the two height adjustment screws to a single 'lug' that attaches to the intonation screws. This design cuts down on the mass of the saddle by about half! Beyond aesthetics, I cannot be certain how this actually affects the tone. 

Aria Pro II CS-250 die-cast bridge
Unusual saddle design on Aria's die-cast bridge
I feel that the CS-250 would benefit from having a set of 009-.042 strings installed, instead of the .010-.046 set I decided on. Beyond the string tension aspect, I think that a set of 9's would show off the tonal variations of the coil tap and phase reversal switches a little better. To my ears, true single coils and coil tapped humbuckers 'sparkle' a little bette with .009 gauge strings.

According to Aria authority site matsumoku.org, the Aria Pro II Cardinal Series was produced from 1981 to 1983, making this guitar at least 33 years old as of this writing!


LinkWithin

Related Posts Plugin for WordPress, Blogger...