Showing posts with label luca quacquarella. Show all posts

Saturday, October 22, 2016

Les Paul Junior Kit Build

Our guitar wiring expert friend, Arnold, has always been a fan of Les Paul Juniors. And while browsing the net recently, he came across a seller offering a double cutaway Junior-style neck and body for a little over 300 bucks.

Taking the plunge, the beautiful raw wood kit that arrived featured an Indian rosewood fingerboard, mahogany neck, and a one piece mahogany body. Our luthier buddy, Luca Quacquarella, was tasked with assembly, painting and final setup.
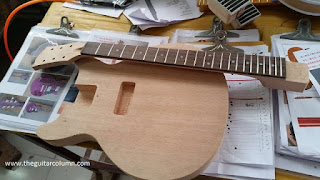
Les Paul Junior kit mahogany neck and body
Raw mahogany neck and body

Arnold chose to not have the mounting stud holes for the bridge drilled. The kit maker would only provide metric sized screw holes whereas Arnold wanted to use a compensated MojoAxe bridge that came with Imperial sized studs.


Some Les Paul Junior History

Originally issued in 1954, the Les Paul Junior was Gibson's foray into the budget and student market. Featuring slab mahogany bodies and very simple electronics in the form of a single P90 bridge pickup and basic volume and tone controls, the Junior eschewed all accoutrements of its more expensive Les Paul solidbody cousins.  

No carved maple tops, binding, or fancy inlays for this little guy!

Les Paul Junior kit mahogany neck and body
Checking the neck to body fit

While the very first Les Paul Juniors were single cutaway instruments finished in a brown sunburst, Gibson later made available a TV Yellow finish model in 1955. In the days of black and white television, white guitars tended to 'wash out', appearing overly bright on-screen. The TV Yellow finish made the guitar appear a more natural white.

The double cutaway Junior, like Arnold's kit, was released in 1958 in response to player's requests for more access to the upper frets.

Assembly and Paint

A little bit of play was evident in the neck to body joint when the kit arrived -- they could have cut it more precisely for a snug fit.

After gluing the neck to the body, Luca proceeded with applying a light dark stain to bring out the grain of the wood a little more under the final paint. Three coats of nitrocellulose lacquer, closely matching Gibson's original TV Yellow, were then applied, with the paint allowed to dry thoroughly between coats.
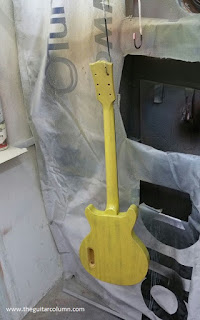
Les Paul Junior kit TV Yellow
Spraying the first coat of TV Yellow

On the black painted headstock face, Arnold chose to go with a smaller, stylized Luca Custom Guitars logo for simplicity. 
Les Paul Junior kit headstock face
Luca custom logo and Kluson tuners


Hardware and Electronics

In the spirit of the original Les Paul Juniors, Kluson button vintage-style tuners were chosen, along with a black, single-ply pickguard. Luca also installed a bone nut he cut and polished from scratch.

Next came the tricky task of drilling the screw holes for the bridge studs.

Because the Junior used a simple stopbar tailpiece that functioned as a bridge, the measurement had to be very precise as there are no individual saddle screws for intonation adjustment. The MojoAxe stopbar bridge is compensated for better intonation by way of subtle ridges molded into the top, but its placement is still crucial nonetheless.

Instead of measuring from nut to bridge, Arnold suggested attaching a high E and a low E string to an anchor point on the workbench. Sliding the bridge along the body and checking with a strobe tuner until intonation was achieved, the stud holes were then drilled and the bridge mounted. No room for error here!

Les Paul Junior kit Porter P90 pickup
Porter P90 hot wound pickup installed

At Luca's suggestion, a hot wound Porter P90 pickup was chosen, with Arnold supplying his own wiring harness for the electronics -- Emerson pots, in values of 500k for the volume control and 250k for the tone, with a .022uF paper-in-oil capacitor. Apparently, pot values of 500k for volume and 250k for tone are the magic numbers for P90 equipped guitars.
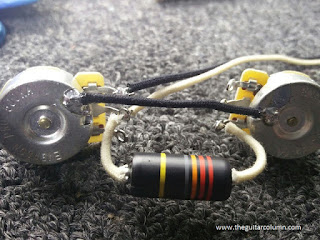
Les Paul Junior kit wiring harness
Emerson volume and tone pots and paper-in-oil capacitor
Relic'ing

To give it that lived-in, played for decades look, Luca gave the guitar a tasteful relic finish.

Les Paul Junior kit relic TV Yellow finish
Relic'd TV Yellow finish

So many guitar manufacturers these days use templates to map out wear spots and dings on new guitars. It saves a lot of time, but one can't help feeling a little cheated that almost no thought went into relic'ing the instrument. Not to mention that you would have guitars with about the same wear spots in the same places.

Les Paul Junior kit relic TV Yellow finish
Nitrocellulose TV Yellow finish

Luca still does it the old fashioned way -- artistically and with much deliberation for where a guitar might receive its dings, scrapes and wear spots after years of gigging.

And damn, does this thing look like a real Les Paul Junior from the 50's!

Thursday, May 12, 2016

Refinishing A PRS Custom 24 Part 2 | The Final Reveal

In our last article, Refinishing A PRS Custom 24 Part 1, we detailed the removal of the guitar's cloudy green lacquer and extensive prep work for the big refinish -- entirely in nitrocellulose lacquer -- by luthier Luca Quacquarella.

In my humble opinion, our Italian friend really outdid himself on this particular job.

The following pics were taken by Reggie Tan at Luca's workshop on the day he went to pick up his newly refinished PRS.

As always, click on the pictures to enlarge. Enjoy!

PRS Custom 24 refinished top
PRS Custom 24 refinished top. This guitar was finished entirely in nitrocellulose

PRS Custom 24 refinished top
Stunning flame maple top on this PRS Custom 24 Artist model

PRS Custom 24 Artist abalone bird inlays
Artist models like this one also feature choice abalone mother of pearl bird inlays

PRS Custom 24 scraped binding
Another view of the top and 'scraped' maple binding

PRS Custom 24 Artist headstock abalone inlay
Inlaid abalone PRS logo and Indian rosewood headstock veneer

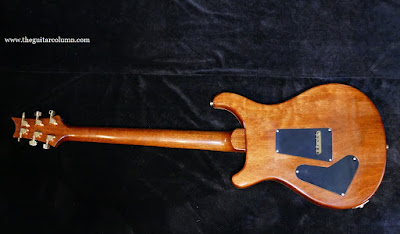
PRS Custom 24 refinished back
Back and neck also refinished in nitrocellulose lacquer

PRS Custom 24 refinished headstock back
A view of the back of the headstock. Note distinctive quarter sawn grain pattern

PRS Custom 24 refinished back and neck
PRS's distinctive neck joint

PRS Custom 24 refinished top
Final view of the top. Note light shading of violet mixed in with blue on the edges

PRS Custom 24 refinished
Happy owner, happy luthier! Luca (on the left) with Reggie
(Photographs of this PRS Custom 24 courtesy of Reggie Tan. All rights reserved)

Thursday, May 5, 2016

Refinishing A Music Man Luke Part 2 | The Final Reveal

In Part One of refinishing this Music Man Luke guitar, we talked about the many stages and the weeks it took to get it to its final state.

Reggie the owner spent many hours with our patient Italian friend, luthier Luca Quacquarella, discussing, poring over and, at times, agonizing about the many small details to get everything just right. It was, without doubt, a labour of love that transformed this guitar from a very sorry state to its current glory.

But enough jibber-jabber.

I am very pleased to present to you, dear reader, the refinished and resurrected Music Man Luke. Click on the pictures to enlarge, and enjoy!

(Photographs courtesy of Reggie Tan. All Rights Reserved)

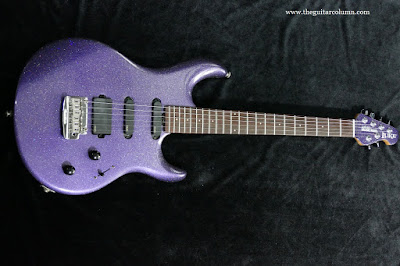
Music Man Luke refinished body
Seven coats of nitrocellulose lacquer was used to build the finish 
Music Man Luke refinished body
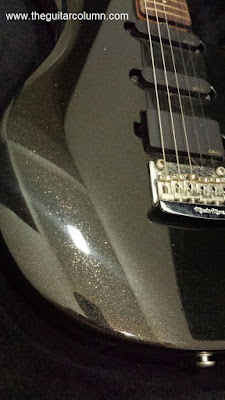
Sparkly!
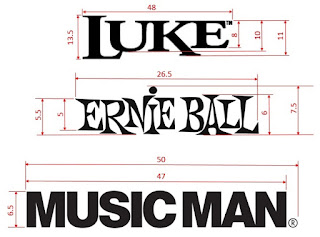
 Recreated Ernie Ball Music Man and Luke logo  
Music Man Luke refinished headstock
Another view of the headstock
Music Man Luke refinished headstock back
Recreated 'Made In San Luis Obispo' logo
Music Man Luke refinished neck
The back of the neck refinished in clear nitrocellulose
Music Man Luke neck plate
View of the Music Man 5-bolt neck plate and refinished back
Music Man Luke refinished neck and body
Full view of the refinished neck and back
Music Man Luke bridge and pickups
Stainless Allen screws replaced the original rusted saddle screws 
Music Man Luke refinished body
Rainbow of pink, green, gold and silver mixed in the metallic purple flake

Music Man Luke refinished body and neck
The metallic purple body against the highly figured maple neck. Stunning!
Music Man Luke refinished
Full view of the refinished Music Man Luke 

Wednesday, May 4, 2016

Refinishing A Music Man Luke Part 1

In an earlier article, I mentioned my encounter with a Music Man Luke and its unusual flaking finish. The polyester finish -- usually the toughest, most impervious of guitar finishes -- was very mysteriously lifting and peeling away from the body in brittle chunks. A potato chip-sized piece even fell away as I was examining the guitar, landing on the floor with a distinct 'plik'.

Music Man Luke body
This Music Man Luke's original flaking finish.

Our good buddy Reggie, the owner of this guitar, had left it in the care of a repair shop where it languished unattended, for -- get a load of this -- not days, not weeks, but several months! The shop owner claimed that he was 'waiting for the Music Man decal'.
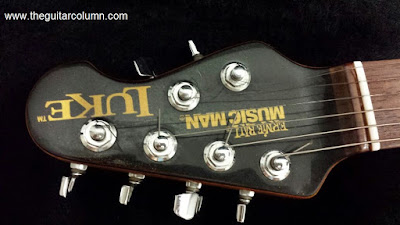
Sure. Waiting for it to materialize out of thin air, maybe. And it didn't occur to him to at least start working on the body? Amazing.

Music Man Luke headstock
Headstock area where more of the original finish seems to be peeling off 

When Reggie told me how long he had been waiting on that guitar, I instantly thought of my luthier friend Luca Quacquarella. Showing him a few pictures of the Les Paul BFG that Luca had refinished for me convinced Reggie that our Italian friend was indeed the man for the job.

Luca had to clear his backlog of repairs before he could start work on the Music Man. But within a week, Reggie sent me this picture.

Music Man Luke body stripped
The Luke stripped down

To Ernie Ball/Music Man's credit, they did choose a pretty clean piece of alder for this guitar. Nicer woods are normally reserved for where the wood grain would be visible, like in clear or sunburst finishes. More gnarly woods are used for opaque colors like the black sparkle finish this guitar came in. 

With the body stripped down to the bare wood, the refinishing process could finally start!
Luca recommended going with an all nitrocellulose finish for this guitar. Nitro finishes are much more labour intensive to apply but they allow the guitar to breathe and resonate better than the plastic, polyester finishes. Perhaps not a significant difference tone-wise on a solidbody guitar like this one, but a huge difference when it comes to acoustic and hollowbody instruments.

With a nitrocellulose finish, up to ten coats are needed for a mirror-like shine. Each coat must be allowed to thoroughly dry for a day or two, then wet sanded with very fine grit sandpaper before the next coat.

Many major guitar manufacturers that claim to use nitrocellulose usually mix in a plasticizer to allow for fewer coats to achieve a high gloss finish. Far less labour intensive and they are able to get the guitars out the door more quickly.

Luca started off by spraying a couple of initial coats of white to act as a base coat.

Music Man Luke base coat
Initial white base coat

Luca has managed to source a local supply of nitrocellulose paints in a stunning variety of colors. Because of current restrictions on importing paints and flammable liquids, a license would be required if he were to order them by mail through companies in the US like Stewmac.com

Metallic purple nitrocellulose paint

After a few tests of the purple lacquer mixed in with different degrees of black tint to decide on the final shade of metallic purple, the next step was choosing the right size of metal flake or paint glitter.

That's right folks, metal flake is available in many colors and in several sizes! Too small, and the effect is too subtle. Too large, and it's Mardi Gras time!

Metallic purple glitter paint flakes
Metallic purple glitter flakes


Decisions, decisions..

After a couple of test runs, Reggie and Luca agreed upon the metal flake size that they felt would work best. And although the jar says 'purple metallic flake', the end result shows a mix of purple, pink, gold and silver flecks. Real nice! But unfortunately something that doesn't show up readily in photos.

And through the entire process, Reggie was not a mere bystander.

Luca has a go-to guy he always uses to make his custom guitar decals. And when the finish was stripped off the headstock, the original Music Man Luke logo on the front and 'Made In San Luis Obispo' lettering on the back, went along with it.

Music Man Luke headstock logos

Reggie's challenge was to put his design skills to use to recreate the headstock logo in graphic form. For Luca's decal guy to reproduce it properly, it also needed to be to the exact scale as it would finally appear on the guitar.

Not bad, Reg. Not bad at all. Even Steve Lukather wouldn't be able to tell that this was a reproduction decal.

Music Man Luke headstock decal
Music Man Luke decal applied to headstock

And since his guitar was undergoing a major refinish, Reggie decided to also source for a set of stainless steel Allen screws to replace the rusted height adjustment screws of the bridge saddles.

Music Man Luke bridge
In the process of installing new stainless steel saddle screws 

Why on Earth guitar manufacturers would use ordinary metal screws on a part of the guitar that would be constantly exposed to sweat and grime from the player's hand, I could never understand. And on a high-end guitar, no less. Once those suckers rust up, any attempt at adjusting saddle height becomes impossible. And stainless steel screws are cheap too.

Luca's initial plan was to follow the original Music Man style of lacquering the back of headstock up to the first fret, and using a mineral wax composite for the rest of the neck for that bare wood feel. In the end I was quite relieved when he decided to hard lacquer the back of the entire neck. Minimal chance of that thing moving, ever!

He must have heard my protestations and my mentioning playing another Music Man Luke recently where the neck was starting to twist, resulting in several buzzing frets along the treble side only, despite the high action.

It's always a crap shoot when going with an oil finished neck. Especially in Singapore's high humidity and warm weather. Factor in a highly figured maple neck, like what Music Man uses, and the odds of having a warping neck increase several-fold. 

Just my humble experience. Your own experience may vary depending on the climate and humidity of your country and the quality of your environment where you store your guitars.

After spraying the white undercoat, Luca next applied several coats of the metallic purple paint, allowing each coat to dry and wet sanding between coats as mentioned. The purpose of wet sanding between coats is to ensure that the finish has no bumps, drips or 'orange peel', a fine dimpled texture as a result of overspray. All imperfections and uneveness must be removed before the next coat is layered otherwise they will all show up in the final finish in all their lumpy glory. Which will look awful on close inspection.

Music Man Luke refinish
Checking in bright light for spray flaws

The final coat is then polished on a buffing machine to a high gloss lustre.

And in case you're wondering, Luca does all his refinishes in a proper spray booth with a suitably sized exhaust fan. And did I mention his white haz-mat suit, gloves and respirator? Nitrocellulose is highly carcinogenic and is not something you would want to inhale in its liquid form!

Stay tuned for Refinishing A Music Man Luke Part 2 and the final reveal!

Sunday, July 26, 2015

Music Man Luke Signature Model with Flaking Finish Problem

I met with my good buddy Reggie for lunch recently to talk guitars and gear, and also for him to pass me a batch of his superb homemade cheng tng -- a sweet Chinese dessert known for its cooling or 'yin' properties.  We all need to balance our yang with some yin once in awhile. And if we can get our yin while satisfying our sweet tooth, so much the better.

Tupperware containers of cheng tng firmly in hand, Reggie told me he wanted to show me a guitar he had left in a music store that was awaiting a refinish. I thought it was going to be just another 'vanity refinish', much like the refinish job I had done on my Gibson Les Paul BFG a few months ago. Purely cosmetic and didn't really need to be done, but you know how it is -- a newly refinished guitar is the next best thing to a new guitar!

We entered the shop, made some small talk with the owner and looked around a little bit. Reggie disappeared into a corner of the shop and reappeared holding a guitar. It was going to rain outside and it was getting a little dark in the shop, but judging from the silhouette (no pun intended!) of the headstock, I could tell it was a Music Man guitar of some sort.

And when he brought it into the light, I could hardly believe my eyes.

There it was, an Ernie Ball/Music Man Luke model sans strings and looking a little worse for wear.

Which is probably a huge understatement.

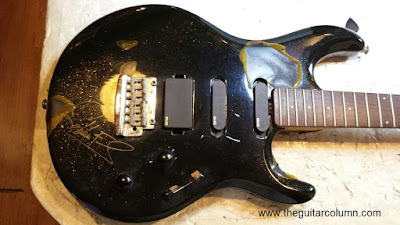
music man luke
Finish flaking off the headstock face of this Music Man Luke 

The black sparkle polyester finish seemed to have cracked and was lifting off in chunks, leaving either bare wood or the black undercoat. Indeed a small piece cracked off as I was examining the guitar and when I picked the piece up off the floor, I found it had the texture and brittleness of a potato chip, yellowed, hard and crumbly.

It was something that, in my 40 years of being around guitars, I had never seen before. And as we all know a polyester finish is as hard and durable a finish as you can get.

music man luke
Finish on the guitar's top 

My luthier friend, Luca Quacquarella, was just complaining to me a few months ago about how difficult it was to scrape off a polyester finish, saying that even an overnight soak in paint remover sometimes failed to do the job!

music man luke
Back of the guitar

But frankly, Ernie Ball/Music Man finish problems are something not entirely new to me.

Another good buddy of mine returned from the States in the early 90's with a fire-engine red 5-string Music Man bass. It played great and sounded even better. Ernie Ball chose not to mess with the original Leo Fender-era Music Man bass's design and electronics, and the pickups on this bass were classic Sting Ray with all their growl and clarity.

music man luke neck joint
Close up of the finish around the 5-bolt neck joint

Paired with a highly figured bird's eye maple neck, the glossy red finish was also really something to behold.

But after a couple of months of owning the bass, things started to go south rather quickly.

That wonderful red polyester finish started to dull and become tacky and sticky to the touch. It got so bad that fibers from the inside of the hardcase were actually sticking to finish like tiny hairs.
Fortunately, there was no Ernie Ball/Music Man dealer in Singapore at the time, or else they would have been faced with quite a sticky situation -- literally -- as this was not an isolated case.

Put it down to Singapore's 90% humidity and tropical heat I suppose. But strange that other major instrument brands never had the same problem.

Oddly enough, Reggie owns another Music Man Luke also from about 2005 and in exactly the same color, and it is in pristine condition!

ernie ball music man luke
Reggie's other Music Man Luke from 2005 

The only thing indicating its age is that the Luke logo has yellowed from its original silver.

ernie ball music man luke
Black sparkle finish on Reggie's other Luke

(Pictures courtesy of Reggie Tan)

Friday, December 5, 2014

Vintage Gibson ES-175 Restoration

Our favorite local Italian luthier, Luca Quacquarella, was recently commissioned with this vintage Gibson ES-175 restoration.
gibson es-175 restoration

This guitar, which dates back to 1964, was the property of one of the local hotels in Singapore and had been languishing in a damp basement storeroom, unplayed and neglected, for a few decades. Someone had even pasted a couple of hotel baggage stickers on the back, just in case the ownership of the guitar would ever be in doubt.

The nitrocellulose finish had clouded with the passage of time and the seam on the lower bout of the guitar had split due to water damage. The Hofner tailpiece, that someone had used to replace the original ES-175 'zig-zag' trapeze tailpiece, had also severely corroded.
gibson es-175 restoration
Hotel baggage stickers

Although how anyone could possibly damage an ES-175 tailpiece to the point where it had to be replaced, we'll probably never know. Remember that this was a guitar used by the hotel lobby band and not subject to the rigors of outrageous stage antics or heavy usage. My guess is that someone took a fancy to the original tailpiece and swapped it out for the Hofner tailpiece when no one was looking.

Luca's first task was to remove all the hardware and electronics, labelling everything to facilitate their re-installation later. The pickups that came with the guitar had the rectangular black stickers with Patent No. 2737842 on the underside, and very large diameter volume and tone potentiometers, true to the period that this guitar was from.

gibson es-175 restorationInterestingly, Patent No. 2737842 was not the patent designation for the humbucking pickups but was actually the patent number for Gibson's trapeze tailpiece bridge!

As you can see in the pic on the right, the lower seam had completely split and was lifting away slightly.

After Luca glued the seams together, he needed to match the deep brown color of the original finish on the sides. Mixing dark brown nitrocellulose lacquer with a smidgen of black, he managed to perfectly match the original finish.

gibson es-175 restoration
Relic'ing and check lines added!
To match the checking of the original finish, Luca added artificial check lines to the new, pristine lacquer. A good knowledge and understanding of the grain and directional patterns of how lacquer would naturally check is definitely required here.

Although the precise technique that he used to artificially create the checked lacquer lines is something that he does not seem to want to talk about. A trade secret shall remain a trade secret!

gibson es-175 restoration
Once the repair had been completed, the entire guitar was gently wet-sanded to bring back some of the original shine of the lacquer on the headstock, back of the neck, and the body of the guitar.

But according to Luca, he was careful not to make it too shiny, lest it look too new and fake.

To complete the repair and restoration, an after-market ES-175 tailpiece and pickguard were special-ordered to replace the Hofner tailpiece and the original celluloid pickguard. Celluloid starts to de-gas after a few decades and this pickguard was already warped and starting to disintegrate.

CrazyParts.de in Germany, by the way, makes an excellent after-market ES-175 zig-zag tailpiece!

Looks like this 1964 Gibson ES-175 is ready for another 50 years of music!
gibson ES-175 restoration

Be sure to also check out my earlier interview with Luca Quacquarella

LinkWithin

Related Posts Plugin for WordPress, Blogger...